Powershell Tutorial


PowerShell Tutorial

What is PowerShell?
Features of Powershell
How to launch PowerShell
 PowerShell Cmdlet
Cmdlet vs. Command:
Powershell Data types:
Special Variables
PowerShell Scripts
 First PowerShell Script
What is PowerShell ISE?
PowerShell Concepts
Advantages of using PowerShell script
PowerShell Vs. Command Prompt
Applications of Powershell
How to Write and Run Scripts in the Windows PowerShell ISE
How to create and run scripts
- To create a new script file
- To open an existing script
- To close a script tab
- To display the file path
- To run a script
- To run a portion of a script
- To stop a running script
How to write and edit text in the Script Pane
- To enter text in the Script Pane
- To find text in the Script Pane
- To find and replace text in the Script Pane
- To go to a particular line of text in the Script Pane
- To copy text in the Script Pane
- To cut text in the Script Pane
- To paste text into the Script Pane
- To undo an action in the Script Pane
- To redo an action in the Script Pane
How to save a script
- To save a script
- To save and name a script
- To save a script in ASCII encoding


What is PowerShell?

Windows PowerShell is object-oriented automation engine and scripting language. It is designed mainly for the system administrators. It helps IT, professionals, to control & automate the administration of the Window OS and other applications.

Features of Powershell

PowerShell Remoting: PowerShell allows scripts and cmdlets to be invoked on a remote machine. Background Jobs: It helps you to invoked script or pipeline asynchronously. You can run your jobs either on the local machine or multiple remotely operated machines. Transactions: Enable cmdlet and allows developers to perform Evening: This command helps you to listen, forwarding, and acting on management and system events. Network File Transfer: Powershell offers native support for prioritized, asynchronous, throttled, transfer of files between machines using the Background Intelligent Transfer Service (BITS) technology.

How to launch PowerShell

PowerShell is pre-installed in all latest versions of Windows. We need to launch PowerShell for that we need to follow the given steps: Step 1) Search for PowerShell in Windows. Select and Click Step 2) Power Shell Window Opens

 PowerShell Cmdlet

A cmdlet which is also called Command let is a is a lightweight command used in the Window base PowerShell environment. PowerShell invokes these cmdlets in the command prompt. You can create and invoke cmdlets command using PowerShell APIS.

Cmdlet vs. Command:

Cmdlets are different from commands in other command-shell environments in the following manners − Cmdlets are .NET Framework class objects It can't be executed separately Cmdlets can construct from as few as a dozen lines of code Parsing, output formatting, and error presentation are not handled by cmdlets Cmdlets process works on objects. So text stream and objects can't be passed as output for pipelining Cmdlets are record-based as so it processes a single object at a time Most of the PowerShell functionality comes from Cmdlet's which is always in verb-noun format and not plural. Moreover, Cmdlet's return objects not text. A cmdlet is a series of commands, which is more than one line, stored in a text file with a .ps1 extension. A cmdlet always consists of a verb and a noun, separated with a hyphen. Some of the verbs use for you to learn PowerShell is: Get — To get something Start — To run something Out — To output something Stop — To stop something that is running Set — To define something New — To create something PowerShell commands Following is a list of important PowerShell Commands: Get-Help: Help about PowerShell commands and PowerShellScriptingtopics Example: Display help information about the command Format-Table Get-Help Format-Table Get-Command: Get information about anything that can be invoked Example: To generate a list of cmdlets, functions installed in your machine Get-Command Get-Service: Finds all cmdlets with the word 'service' in it. Example: Get all services that begin with "vm" Get-Service "vm*" Get-Member: Show what can be done with an object Example: Get members of the vm processes. Get-Service "vm*" | Get-Member Other Commands: Get Module Shows packages of commands Get Content This cmdlet can take a file and process its contents and do something with it Get- get Finds all cmdlets starting with the word 'get- Example: Create a Folder New-Item -Path 'X:\Guru99' -ItemType Directory Output

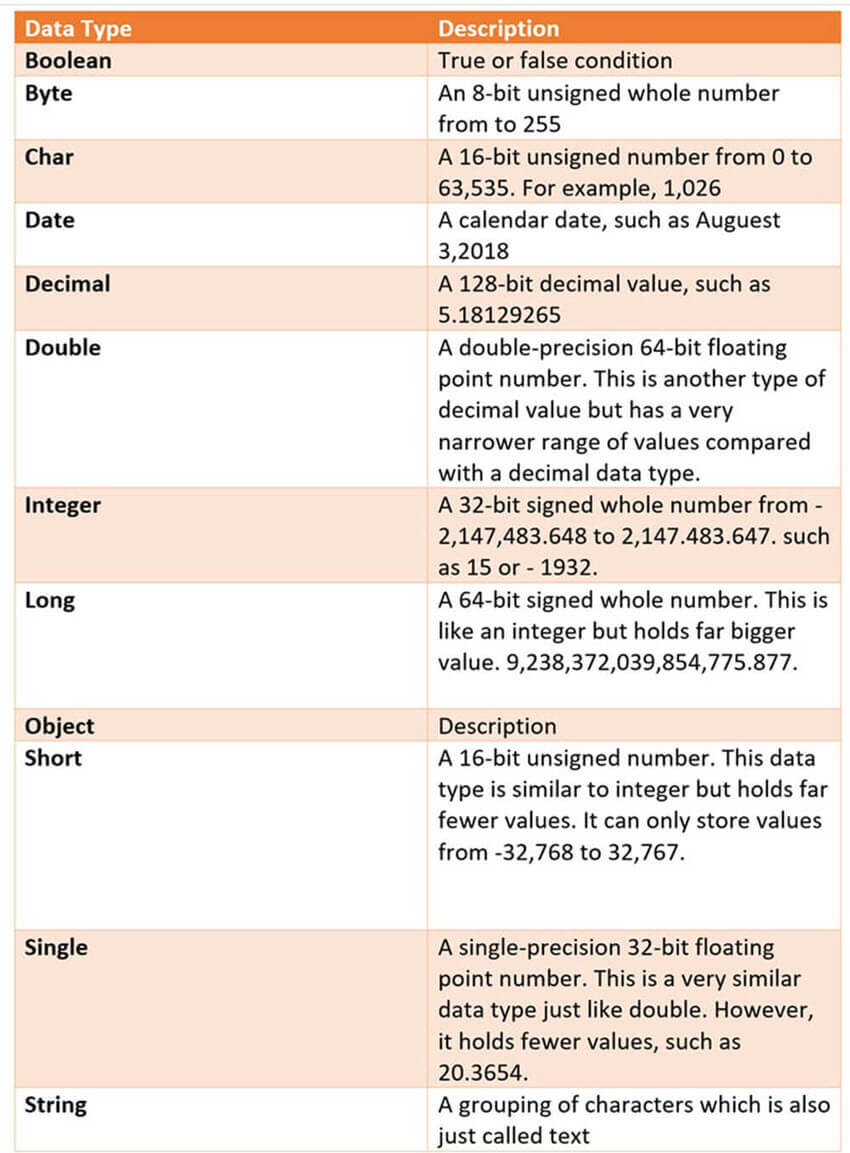
Powershell Data types:

Special Variables

Special Variable Description
$Error An array of error objects which display the most recent errors
$Host Display the name of the current hosting application
$Profile Stores entire path of a user profile for the default shell
$PID Stores the process identifier
$PSUICulture It holds the name of the current UI culture.
$NULL Contains empty or NULL value.
$False Contains FALSE value
$True Contains TRUE value

PowerShell Scripts

Powershell scripts are store in .ps1 file. By default, you can't run a script by just double-clicking a file. This protects your system from accidental harm. To execute a script: Step 1: right-click it and click "Run with PowerShell." Moreover, there is a policy which restricts script execution. You can see this policy by running the Get-ExecutionPolicy command. You will get one of the following output: Restricted— No scripts are allowed. This is the default setting, so it will display first time when you run the command. AllSigned— You can run scripts signed by a trusted developer. With the help of this setting, a script will ask for confirmation that you want to run it before executing. RemoteSigned— You can run your or scripts signed by a trusted developer. Unrestricted— You can run any script which you wants to run Steps to Change Execution Policy Step 1) Open an elevated PowerShell prompt. Right Click on PowerShell and "Run as Administrator" Step 2) Enter the Following commands Get-ExecutionPolicy Set-execution policy unrestricted Enter Y in the prompt Get-ExecutionPolicy

 First PowerShell Script

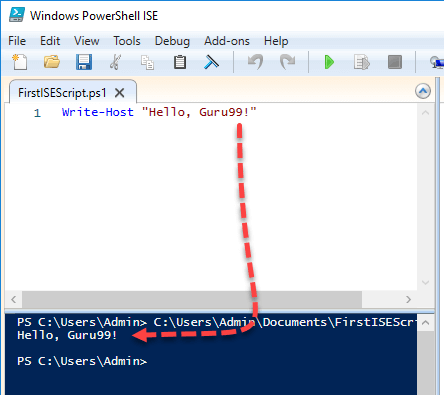
In a notepad write the following command Write-Host "Hello, Guru99!" PowerShell Scripts have an extension ps1. Save the file as FirstScript.ps1 In Powershell, call the script using the command & "X:\FirstScript.ps1"

What is PowerShell ISE?

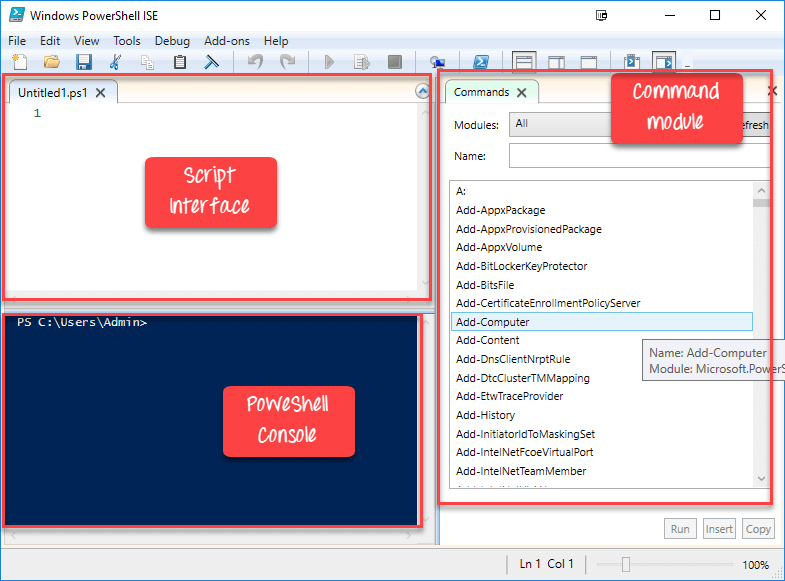
The Windows PowerShell Integrated Scripting Environment(ISE) is the default editor for Windows PowerShell. In this ISE, you can run commands, writer test, and debug scripts in an in a window base GUI environment. You can do multiline editing, syntax coloring, tab completion, selective execution and lots of other things. Windows PowerShell ISE also allows you to run commands in a console pane. However, it also supports panes that you can use to simultaneously view the source code of your script and other tools which you can plug into the ISE. You can even open up multiple script windows at the same time. This is specifically useful when you are debugging a script which uses functions defined in other scripts or modules. The same script we created in notepad, can be created in ISE Paste code into the editor Save Script Use F5 to run the script Observe output in the console Sample 2: The following code will give the Free Virtual Memory in your machine Get-WmiObject -Class Win32_OperatingSystem –ComputerName localhost | Select-Object -Property CSName,FreeVirtualMemory
PowerShell Concepts

Cmdlets Cmdlet are build-command written in .net languages like VB or C#. It allows developers to extend the set of cmdlets by loading and write PowerShell snap-ins.
FunctionsFunctions are commands which is written in the PowerShell language. It can be developed without using other IDE like Visual Studio and devs.
ScriptsScripts are text files on disk with a .ps1 extension
ApplicationsApplications are existing windows programs.
What ifTells the cmdlet not to execute, but to tell you what would happen if the cmdlet were to run.
ConfirmInstruct the cmdlet to prompt before executing the command.
VerboseGives a higher level of detail.
DebugInstructs the cmdlet to provide debugging information.
ErrorActionInstructs the cmdlet to perform a specific action when an error occurs. Allowed actions continue, stop, silently- continue and inquire.
ErrorVariableIt specifies the variable which holds error information.
OutVariableTells the cmdlet to use a specific variable to hold the output information
OutBufferInstructs the cmdlet to hold the specific number of objects before calling the next cmdlet in the pipeline.

Advantages of using PowerShell script

PowerShell scripts are really powerful and could do much stuff in fewer lines. Variables are declared in the form $<variable> Variables could be used to hold the output of command, objects, and values. "Type" of a variable need not be specified.

PowerShell Vs. Command Prompt

PowerShell Command Prompt
PowerShell deeply integrates with the Windows OS. It offers an interactive command line interface and scripting language. Command Prompt is a default command line interface which provided by Microsoft. It is a simple win32 application that can interact and talk with any win32 objects in the Windows operating system.
PowerShell uses what are known as cmdlets. It can be invoked either in the runtime environment or the automation scripts. No such features offer by command prompt.
PowerShell considers them as objects. So the output can be passed as an input to other cmdlets through the pipeline. Command Prompt or even the *nix shell, the output generated from a cmdlet is not just a stream of text but a collection of objects.
The PowerShell is very advanced regarding features, capabilities and inner functioning. Command prompt is very basic.

Applications of Powershell

Today, PowerShell has become an ideal choice for IT administrators as it eases management operation and effort in large corporate networks. For example, let's assume that you are managing a large network which contains more than four hundred servers. Now you want to implement a new security solution. This security solution depends on a certain service which needs to run on those servers. You can surely log in to each server and see if they have that service install and running or not. However, it certainly takes a lot of human errors as your staff needs to spend lots of time on this non-productive process. However, if you use PowerShell, then you could complete this task in just a few minutes. That's because the entire operation is done with a single script which gathers information about the services running on the servers. Summary Windows PowerShell is object-oriented automation engine and scripting language Powershell offers a well-integrated command-line experience for the operation system PowerShell first version 1.0 was released in 2006 PowerShell allows scripts and cmdlets to be invoked on a remote machine PowerShell is pre-installed in all latest versions of Windows A cmdlet is a lightweight command used in the Window base PowerShell environment Get, Start, Out, Stop, Set, New are important PowerShell commands Boolean, Byte, Chat, Decimal, Decimal, Long are important Data Type of PowerShell $Error. $Host, $Profile, $PID, $PSUICulture, $NULL are some special variable used in PowerShell The Windows PowerShell Integrated Scripting Environment(ISE) is the default editor for PowerShell PowerShell deeply integrates with the Windows OS whereas Command Prompt is a default command line interface which provided by Microsoft PowerShell has become an ideal choice for IT administrators as it eases management operation and effort in large corporate networks

How to Write and Run Scripts in the Windows PowerShell ISE

How to create and run scripts

You can open and edit Windows PowerShell files in the Script Pane. Specific file types of interest in Windows PowerShell are script files (.ps1), script data files (.psd1), and script module files (.psm1). These file types are syntax colored in the Script Pane editor. Other common file types you may open in the Script Pane are configuration files (.ps1xml), XML files, and text files. Note The Windows PowerShell execution policy determines whether you can run scripts and load Windows PowerShell profiles and configuration files. The default execution policy, Restricted, prevents all scripts from running, and prevents loading profiles. To change the execution policy to allow profiles to load and be used, see Set-ExecutionPolicy and about_Signing.

- To create a new script file

On the toolbar, click New, or on the File menu, click New. The created file appears in a new file tab under the current PowerShell tab. Remember that the PowerShell tabs are only visible when there are more than one. By default a file of type script (.ps1) is created, but it can be saved with a new name and extension. Multiple script files can be created in the same PowerShell tab.

- To open an existing script

On the toolbar, click Open, or on the File menu, click Open. In the Open dialog box, select the file you want to open. The opened file appears in a new tab.

- To close a script tab

Click the Close icon (X) of the file tab you want to close or select the File menu and click Close. If the file has been altered since it was last saved, you're prompted to save or discard it.

- To display the file path

On the file tab, point to the file name. The fully qualified path to the script file appears in a tooltip.

- To run a script

On the toolbar, click Run Script, or on the File menu, click Run.

- To run a portion of a script

In the Script Pane, select a portion of a script. On the File menu, click Run Selection, or on the toolbar, click Run Selection.

- To stop a running script

There are several ways to stop a running script. Click Stop Operation on the toolbar Press CTRL+BREAK Select the File menu and click Stop Operation. Pressing CTRL+C also works unless some text is currently selected, in which case CTRL+C maps to the copy function for the selected text.

How to write and edit text in the Script Pane

You can copy, cut, paste, find, and replace text in the Script Pane. You can also undo and redo the last action you just performed. The keyboard shortcuts for these actions are the same shortcuts used for all Windows applications.

- To enter text in the Script Pane

Move the cursor to the Script Pane by clicking anywhere in the Script Pane, or by clicking Go to Script Pane in the View menu. Create a script. Syntax coloring and tab completion provide a richer editing experience in Windows PowerShell ISE. See How to Use Tab Completion in the Script Pane and Console Pane for details about using the tab completion feature to help in typing.

- To find text in the Script Pane

To find text anywhere, press CTRL+F or, on the Edit menu, click Find in Script. To find text after the cursor, press F3 or, on the Edit menu, click Find Next in Script. To find text before the cursor, press SHIFT+F3 or, on the Edit menu, click Find Previous in Script.

- To find and replace text in the Script Pane

Press CTRL+H or, on the Edit menu, click Replace in Script. Enter the text you want to find and the replacement text, then press ENTER.

- To go to a particular line of text in the Script Pane

In the Script Pane, press CTRL+G or, on the Edit menu, click Go to Line. Enter a line number.

- To copy text in the Script Pane

In the Script Pane, select the text that you want to copy. Press CTRL+C or, on the toolbar, click the Copy icon, or on the Edit menu, click Copy.

- To cut text in the Script Pane

In the Script Pane, select the text that you want to cut. Press CTRL+X or, on the toolbar, click the Cut icon, or on the Edit menu, click Cut.

- To paste text into the Script Pane

Press CTRL+V or, on the toolbar, click the Paste icon, or on the Edit menu, click Paste.

- To undo an action in the Script Pane

Press CTRL+Z or, on the toolbar, click the Undo icon, or on the Edit menu, click Undo.

- To redo an action in the Script Pane

Press CTRL+Y or, on the toolbar, click the Redo icon, or on the Edit menu, click Redo.

How to save a script

An asterisk appears next to the script name to mark a file that hasn't been saved since it was changed. The asterisk disappears when the file is saved.

- To save a script

Press CTRL+S or, on the toolbar, click the Save icon, or on the File menu, click Save.

- To save and name a script

On the File menu, click Save As. The Save As dialog box will appear. In the File name box, enter a name for the file. In the Save as type box, select a file type. For example, in the Save as type box, select 'PowerShell Scripts (*.ps1)'. Click Save.

- To save a script in ASCII encoding

By default, Windows PowerShell ISE saves new script files (.ps1), script data files (.psd1), and script module files (.psm1) as Unicode (BigEndianUnicode) by default. To save a script in another encoding, such as ASCII (ANSI), use the Save or SaveAs methods on the $psISE.CurrentFile object. The following command saves a new script as MyScript.ps1 with ASCII encoding. $psISE.CurrentFile.SaveAs("MyScript.ps1", [System.Text.Encoding]::ASCII) The following command replaces the current script file with a file with the same name, but with ASCII encoding. $psISE.CurrentFile.Save([System.Text.Encoding]::ASCII) The following command gets the encoding of the current file. $psISE.CurrentFile.encoding Windows PowerShell ISE supports the following encoding options: ASCII, BigEndianUnicode, Unicode, UTF32, UTF7, UTF8, and Default. The value of the Default option varies with the system. Windows PowerShell ISE doesn't change the encoding of script files when you use the Save or Save As commands.

PowerShell Scripting Tutorial

Introduction
Setting up your PowerShell environment
PowerShell cmdlets
Some commonly used cmdlets
PowerShell scripting
PowerShell scripting tutorial summary
Additional resources
Detail Table of content
Introduction
  Caution:
Setting up your PowerShell environment
 Install PowerShell
 Run PowerShell
 Check the execution policy
  Restricted
  AllSigned
  RemoteSigned
  Unrestricted
 Install modules and packages
PowerShell cmdlets
  Get-Help
  Set-Item
  Start-Service
  Stop-Process
  Out
  New
 Examples of PowerShell cmdlets
  Get-Process:
  Get-Service:
  Get-ChildItem:
 Cmdlet aliases
  Get-Alias
 Cmdlet parameters and arguments
  -Name
  -Path
  Get-Process
 Data types
  String:
  Integer:
  Double:
  Boolean:
  true
  false
  Hashtable:
  Array:
 Variables
  $
  “$MyVariable”
  “$myvariable”
  =
 Pipes
 Getting help
  Get-Help to
  -Examples
Some commonly used cmdlets
 Working with files and folders
  Get-ChildItem
  Where-Object
  Remove-Item
  Get-ChildItem:
  New-Item:
  Copy-Item:
  Move-Item:
  Remove-Item:
  Set-Item:
  Test-Path:
  Get-Content:
  Set-Content:
 Working with date and time
  Get-Date:
  Set-Date:
  New-TimeSpan:
  $timeDifference
  $timeDifference
PowerShell scripting
 PowerShell Integrated Scripting Environment (ISE)
  powershell ise
  Menu bar:
  Toolbar:
  Scripting tabs:
  Status bar:
  Commands pane:
  Text-size slider:
 Sample scripts
 Adding comments to scripts
 Brackets, parentheses and braces
  Square brackets:
  []
  Parentheses:
  Curly braces:
  ForEach-Object
  Where-Object
 Loops
  For loop:
  ForEach loop:
  While loop:
  Do-While loop:
 Conditions
  If statement:
  If-else statement:
  Else-if statement:
PowerShell scripting tutorial summary
  Get-Help
Additional resources
 Useful PowerShell scripts
  Manage AD users
  Manage AD computers
  Manage groups and OUs
  Manage other things
 Advanced PowerShell scripting guidance
 Other resources


Introduction

Windows PowerShell is a tool for task automation and configuration management that combines a command line shell with a scripting language. IT professionals rely on PowerShell to: Automate common tasks Manage remote machines Share data between applications Manage infrastructure as code Learning even a few basic set of Windows PowerShell commands and core scripting capabilities can help you achieve significant automation. To help, this PowerShell tutorial covers PowerShell scripting basics for beginners.   Caution: Once you’ve learned a few PowerShell basics, it is easy to start running commands — but they can have a profound impact on the stability and security of your IT ecosystem. As you are getting started with PowerShell, be sure to experiment with it only in a sandboxed environment. Handpicked related content: [Free eBook] PowerShell Scripting Tutorial for Beginners

Setting up your PowerShell environment

Before you can run PowerShell scripts, you need to set up the Windows PowerShell environment. Here are the steps involved.

 Install PowerShell

PowerShell comes pre-installed on most Windows operating systems. However, if you need to install a newer version, you can download it from the Microsoft website or use Windows Package Manager (Winget) or Chocolatey Package Manager.

 Run PowerShell

To launch the PowerShell command line, enter powershell.exe in the Windows Start menu. You’ll see a screen like the following:

 Check the execution policy

By default, PowerShell restricts the running of scripts for security reasons. You can check your policy’s setting by running the Get-ExecutionPolicy command: You will get one of the following values:   Restricted — No PowerShell scripts may be run. This is the default setting.   AllSigned — You can run PowerShell scripts signed by a trusted developer.   RemoteSigned — You can run your own scripts or scripts signed by a trusted developer.   Unrestricted — You can run any script you want. To change the execution policy setting, use the Set-ExecutionPolicy cmdlet:

 Install modules and packages

Windows PowerShell can be extended with additional modules and packages from the PowerShell Gallery public repository or other sources. You can use the Install-Module cmdletto install modules directly from the PowerShell Gallery. Then you can use the cmdlets and functions defined in the module just like built-in PowerShell commands.

PowerShell cmdlets

PowerShell includes a wide range of cmdlets (pronounced “command-lets”) for common administrative tasks, such as managing processes, services, files, and users. Each one performs a single function but they can be combined in PowerShell scripting. Cmdlets have a verb-noun structure, where the verb indicates the action to be performed and the noun specifies the target of the action, such as   Get-Help,   Set-Item,   Start-Service or   Stop-Process. Other key verbs include   Out, which is used to output something (such as a file), and   New, which is used to create something (“new” is not a verb, of course, but it functions as one). Cmdlets typically produce objects as output, allowing for easy manipulation and integration with other cmdlets and scripts.

 Examples of PowerShell cmdlets

  Get-Process: Gets the information about running processes of the system.   Get-Service: Retrieves the status of services on the system.   Get-ChildItem: Retrieves a list of files and folders in a directory.

 Cmdlet aliases

Many cmdlets have one or more aliases, which are shortened versions of their names. For example, the following two commands perform the same action: Start-Process notepad start notepad Similarly, you can use either of the following commands to stop the Notepad process: Stop-Process -Name notepad spps -Name notepad To see all aliases, run the   Get-Alias cmdlet:

 Cmdlet parameters and arguments

Cmdlets accept parameters that control their behavior. Parameters are specified using a hyphen followed by the parameter name, such as   -Name or   -Path. Some parameters accept arguments, which are values of a particular data type (data types are explained below). For example, here is the syntax of the   Get-Process cmdlet with its parameters in orange and their arguments in green: Get-Process [-Name <String[]>] [-ComputerName <String[]>] [-FileVersionInfo] [-Module] [-InputObject <Process[]>] [-IncludeUserName] [-ExcludeUserName] [-Credential <PSCredential>] [-Id <Int32[]>] [-IncludeTotalProcessorTime] [-WhatIf] [-Confirm]

 Data types

Here are some common data types in PowerShell:   String: A string is a sequence of characters enclosed in single quotes (‘ ‘) or double quotes (” “). A string can include letters, numbers, symbols and spaces.   Integer: Integers are whole numbers without any decimal or fractional parts.   Double: Doubles are floating-point numbers with decimal precision, such as 3.14 or -0.5.   Boolean: Booleans are often used in conditional expressions and comparisons. The only possible values are   true and   false.   Hashtable: A hashtable is a collection of key-value pairs. Each key in a hashtable must be unique. Hashtables are often used to store and retrieve data using named keys.   Array: An array is a collection of ordered and indexed elements of the same data type, such as a set of names or integers. In PowerShell, you can create an array by assigning a comma-separated list of values enclosed in parentheses to a variable, as shown here: $fruits = ("apple", "banana", "orange") To access the elements of an array, you can use the index operator [n]. The index of the first element in the array is 0. Below is an example: $fruits = ("apple", "banana", "orange") Write-Host $fruits[0] # Output from first element: apple Write-Host $fruits[1] # Output from second element: banana Write-Host $fruits[2] # Output from third element: orange You can modify the elements of an array by assigning a new value to an index: $fruits = ("apple", "banana", "orange") $fruits[1] = "grape" Write-Host $fruits[1] # Output: grape

 Variables

Variables are used to store and manipulate data in PowerShell. A variable is a named container that holds a value, such as a string, number, array or objects. PowerShell variables are loosely typed, meaning you do not need to declare the data type of a variable when you assign a value to it. The data type is determined dynamically based on the assigned value. Variable names in PowerShell are comprised of the   $ symbol followed by the name of the variable. Variable names are not case?sensitive, so, for instance,   “$MyVariable” and   “$myvariable” refer to the same variable. Each variable has a scope that determines where is can be accessed: global, script, function or local. By default, variables are local to the scope in which they are created. To assign a value to a variable, use the   = operator, as shown in the following two examples: $myVariable = "Hello, World!" $number = 42

 Pipes

Cmdlets can be connected using the pipeline operator |, which passes the output of one cmdlet to the next cmdlet. This enables creating one-line commands to perform complex operations. For example, this command uses a pipe to output the specified string to a file: "Hello, World!" | Out-File C:pstest.txt And the following example gets all services and sorts them by their status: Get-Service | Sort-Object -property Status You can use multiple pipes. For instance, here the first command gets all services, the second filters for running services only, and the third command limits the output to just their display names: Get-Service | WHERE {$_.status -eq "Running"} | SELECT displayname

 Getting help

You can use   Get-Help to see details about any cmdlet: To get examples for a cmdlet, add the   -Examples parameter: Get-Help Get-Process -Examples

Some commonly used cmdlets

 Working with files and folders

You can use PowerShell to simplify tasks such as creating, copying, moving, deleting and modifying file and folder properties. By using pipelines, conditional logic and loops, you can perform more complex file and folder manipulation tasks. For example, you can use the   Get-ChildItem cmdlet to retrieve a list of files in a directory, filter the results using the   Where-Object cmdlet, and then use   Remove-Item to delete the selected files. Below are some common PowerShell cmdlets for working with files and folders:   Get-ChildItem: Retrieves a list of files and folders in a specified directory   New-Item: Creates new files and folders   Copy-Item: Copies files and folders from one location to another   Move-Item: Moves files and folders from one location to another   Remove-Item: Delete files and folders   Set-Item: Modifies the properties of files and folders.   Test-Path: Checks whether a file or folder exists at a specified path   Get-Content: Retrieves the content of a file and outputs it to the console   Set-Content: Writes content to a file, overwriting any existing content

 Working with date and time

Below are some common PowerShell cmdlets for working with dates and time.   Get-Date: Use this cmdlet to retrieve the current date and time. You can also use it to convert strings to DateTime objects and format dates according to specific patterns. Get-Date -Format: This cmdlet allows you to retrieve the current system date and time in a specific format. For example, you can use Get-Date -Format ‘yyyy-mm-dd’ to get the date in “YYYY-MM-DD” format.   Set-Date: This cmdlet allows you to set the system date and time.   New-TimeSpan: This cmdlet is used to calculate the time span between two dates. It returns a Timespan object representing the time difference, which can be used for further calculations or formatting. Below are some examples of how you can work with dates and time in PowerShell. To get the current time and date: $currentDateTime = Get-Date To create a DateTime object for a specific date in past: $customDate = [DateTime]::Parse("2023-11-10") Calculate the time span between the current date and a past date and store it in the variable   $timeDifference: $timeDifference = New-TimeSpan -Start $currentDateTime -End $customDate Print the value of the variable   $timeDifference: Write-host $timeDifference

PowerShell scripting

PowerShell scripting is a powerful way to automate tasks, manage systems and perform various operations using the PowerShell scripting language.

 PowerShell Integrated Scripting Environment (ISE)

The built-in Integrated Scripting Environment enables PowerShell scripting in a graphical user interface. It provides a powerful set of features for creating, editing, debugging and executing PowerShell scripts, including multiline editing, tab completion, syntax coloring, selective execution and context-sensitive help. Many of the same actions you can take in the Windows PowerShell console are available in menu items and keyboard shortcuts. For example, when debugging a script in the Integrated Scripting Environment, you can right-click a line of code in the edit pane to set a breakpoint. Whether you are a beginner or an experienced PowerShell user, the PowerShell ISE can streamline your workflows and increase your productivity. To launch the PowerShell ISE, enter   powershell ise in the Start menu: Key elements of the PowerShell ISE include:   Menu bar: The Menu bar offers drop-down menus for File, Edit, View, Tools, Debug, Add-ons and Help.   Toolbar: The toolbar under the Menus bar provides buttons that perform actions such as copy, cut, paste, run script, run selection and stop operation.   Scripting tabs: Under the toolbar in the screenshot above, you can see several tabs. Each one is a workspace for writing and running a PowerShell script. The fully qualified path of the script file is displayed in a tooltip when you place mouse cursor on the script tab.   Status bar: At the very bottom of the screen under the scripting tab is a status bar that shows the completion status of the commands and scripts you have run and any error messages.   Commands pane: On the right side of the PowerShell ISE is a pane that lists all available commands.   Text-size slider: At the bottom right is a slider you can use to increase or decrease the size of the text on the screen.

 Sample scripts

Below is a simple example of a PowerShell script that demonstrates how to define variables, use an if-else statement and print a message in the PowerShell console. # Define variables $name = "Jennifer" $age = 35 # Display a greeting based on the age if ($age -ge 18) { Write-Host "Hello, $name! You are an adult." } else { Write-Host "Hello, $name! You are a minor." } Here is another simple PowerShell script; it prompts the user for their name and then greets them: # Prompt the user for their name $name = Read-Host "Enter your name" # Greet the user Write-Host "Hello, $name! Welcome to PowerShell scripting."

 Adding comments to scripts

Leaving comments in your scripts will help you — and your colleagues — better understand what they do. A one-line comment starts with a number sign (#), and a block comment starts with “<#” and ends with “#>”.

 Brackets, parentheses and braces

In PowerShell, delimiters are used for many purposes, including defining arrays, accessing elements, grouping expressions and specifying script blocks. Here are some of the most common:   Square brackets: Square brackets (  []) are used to define and access elements of an array. $fruits = @("apple", "banana", "orange") Write-Host $fruits[0] # Output: apple   Parentheses: Parentheses are widely used in PowerShell, such as to pass arguments, enclose multiple instructions sets or resolve ambiguity. The operator $() is used when you need to nest parentheses in a command. $result = $("The result is: " + (2 + 3)) Write-Host $result #Output: The result is: 5   Curly braces: Braces ({}) are used to define script blocks, which are used in control structures like loops and conditional statements (described below), as well as with cmdlets like   ForEach-Object and   Where-Object. For example: $numbers = @(1, 2, 3, 4, 5) $filtered = $numbers | Where-Object { $_ -gt 3 } Write-Host $filtered # Output: 4 5

 Loops

Loops are used in PowerShell scripts to repeat a block of code multiple times. Here are the most common types of loops:   For loop: Used to execute a block of code a number of times based on the factors specified. Below is an example that will execute a write statement 5 times: for ($i = 1; $i -le 5; $i++) { Write-Host "Iteration $i" }   ForEach loop: Iterates through the elements in a collection, such as an array or a set of objects, and executes the code for each one. Here’s an example: $colors = "Red", "Green", "Blue" foreach ($color in $colors) { Write-Host "Color: $color" }   While loop: Executes a block of code as long as a certain condition is met. Below is an example. $i = 1 while ($i -le 5) { Write-Host "Iteration $i" $i++ }   Do-While loop: Similar to a “while” loop but guarantees that the block of code is executed at least once before the condition is checked. Here’s an example: $i = 1 do { Write-Host "Iteration $i" $i++ } while ($i -le 5)

 Conditions

Conditions are used to control the flow of PowerShell scripts. Here are some conditional statements in PowerShell:   If statement: Executes the code if (and only if) the specified condition is true. Here’s an example: $num = 10 if ($num -gt 5) { Write-Host "The number is greater than 5" }   If-else statement: Extends the “if” statement by providing a block of code to execute if the condition is not true. Here’s an example: $num = 3 if ($num -gt 5) { Write-Host "The number is greater than 5" } else { Write-Host "The number is not greater than 5" }   Else-if statement: Allows for specifying multiple conditions to be checked in sequence instead of just two. Here’s an example: $num = 5 if ($num -gt 5) { Write-Host "The number is greater than 5" } elseif ($num -eq 5) { Write-Host "The number is equal to 5" } else { Write-Host "The number is less than 5" }

PowerShell scripting tutorial summary

This tutorial covered all the PowerShell basics, from how to install and configure PowerShell to running common commands to writing more complex PowerShell scripts. Keep in mind that if you forget something, you can always use the   Get-Help cmdlet!

Additional resources

 Useful PowerShell scripts

  Manage AD users

List all user accounts on a Windows system Create new Active Directory users Discover new AD users Report on AD group membership Find disabled AD users List expired AD user accounts Find locked out AD user accounts Get notified about expired passwords Configure user passwords to never expire in Office 365

  Manage AD computers

Create, delete, rename, disable and join computers in AD List inactive computers in Active Directory

  Manage groups and OUs

Get notified of local administrator group changes Add and remove AD groups and objects in groups Manage OUs and their objects

  Manage other things

Monitor event logs Query event logs Forward event logs in Windows Server 2008 Manage file system access control lists (ACLs) Streamline file management

 Advanced PowerShell scripting guidance

Know when to use Windows PowerShell and when to use the command prompt Master keyboard shortcuts for system administrators Learn how to automate PowerShell scripts with Task Scheduler Learn more about using variables and arrays

 Other resources

Introduction to PowerShell